Garment
Fit clothing to a character, sculpt it, and skin it — the Garment Studio.
MeshForgeGarment dresses a character in an imported or generated garment, as steps on MeshForge's Post stage.
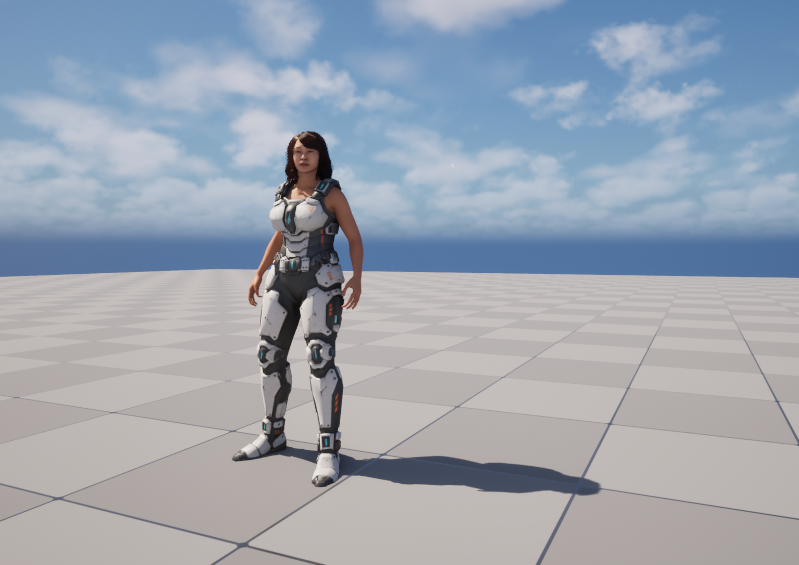
Two definitions produced that: a chest plate and a leg set, each fitted to the same body. A garment is a definition, not a costume — you build them one piece at a time and the character wears whichever it is given.
Paid. Bought once on the account app, and installed by the hub like anything else. Its toolset is open — see distribution.
It needs MeshForge 0.3.0 or later. Removing it changes nothing about MeshForge, and what it made stays as ordinary assets.
The fit step
Exports the target skeletal mesh in its reference pose with its bone landmarks, finds and welds on a MetaHuman's face, hands the body and the garment to a Blender solver — locally or on a runner service — and brings the same garment back wrapped around the body with its vertices, UVs and material slots untouched.
Two modes
| Mode | For |
|---|---|
| Place (default) | A garment made on the character's own picture. Only scales, aligns, and clears the garment off the skin |
| Fit | A garment made for another body, or none. Runs the full articulate / project / relax solve |
Plus a garment type (13 kinds, which decide which limbs may be wrapped), fit style, clearance, shape preservation, projection strength, relaxation and collision passes, and a yaw correction.
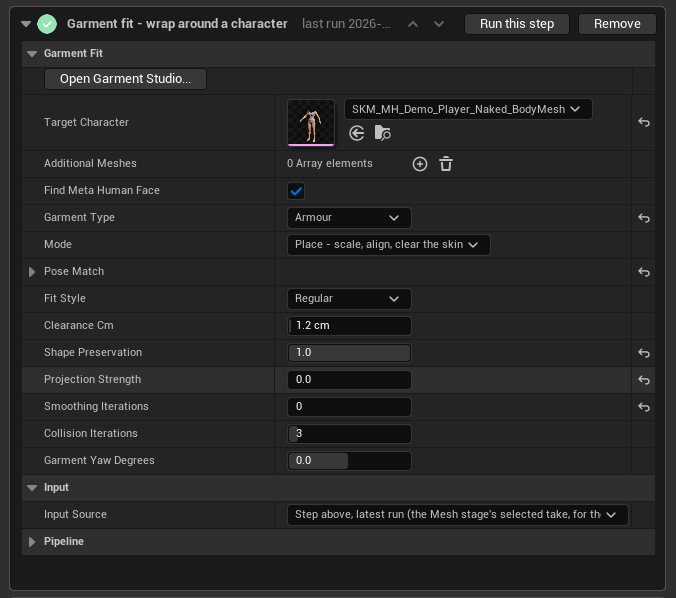
Find Meta Human Face is ticked by default because a MetaHuman body and its face are separate meshes, and a collar fitted to a headless body is fitted wrong. Additional Meshes is where a modular character's hands and feet go.
Input Source is the same picker every post step has — see where a step's input comes from.
Garment Type is not cosmetic. It decides which limbs may be wrapped, so a jacket and a bodysuit solve differently against the same body. Setting it wrong produces a fit that looks nearly right and clips at the one joint the solver was told to leave alone.
Additional Meshes covers a modular character's hands and feet.
Each fit writes its body, landmarks, request, Blender log and a diagnostics
file under Intermediate/MeshForge/GarmentFit/<id>/.
The Garment Studio
One window holds the character and the garment, in three modes that decide who gets the mouse.
Pose and place
Two jobs in one mode, and the panel keeps them apart: place the garment, and pose the body underneath it.
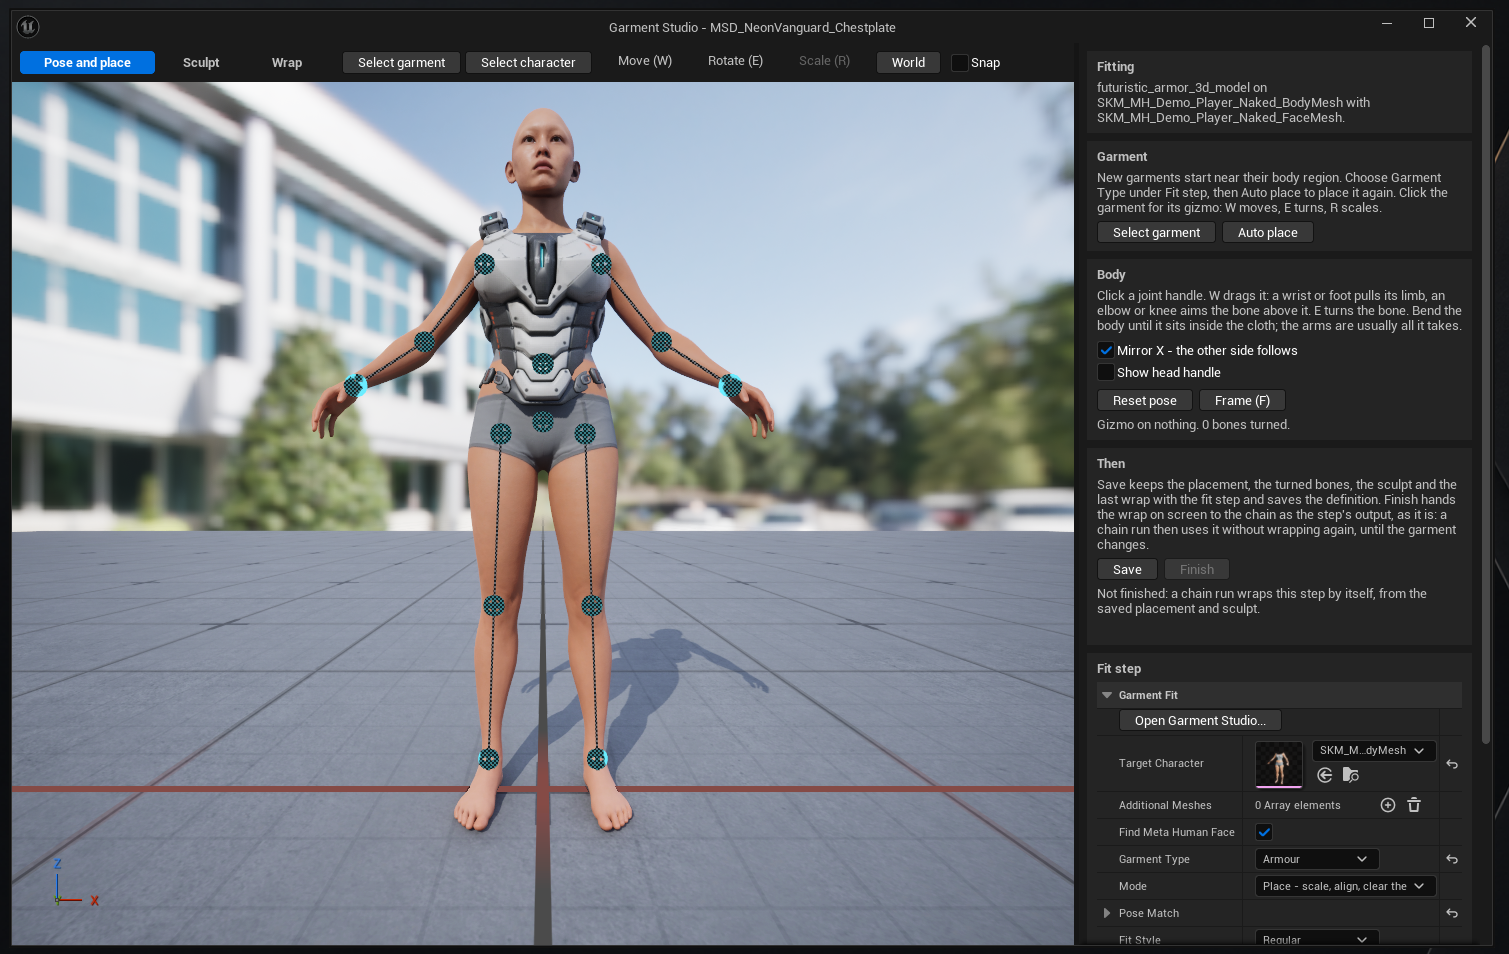
The instructions are in the panel rather than in a manual, and they are worth reading once:
Click a joint handle. W drags it: a wrist or foot pulls its limb, an elbow or knee aims the bone above it. E turns the bone. Bend the body until it sits inside the cloth; the arms are usually all it takes.
Up to 15 joint handles — shoulders, elbows, wrists, hips, knees, feet, chest, pelvis, and optionally the head. Mirror X is on by default and turns the opposite side too.
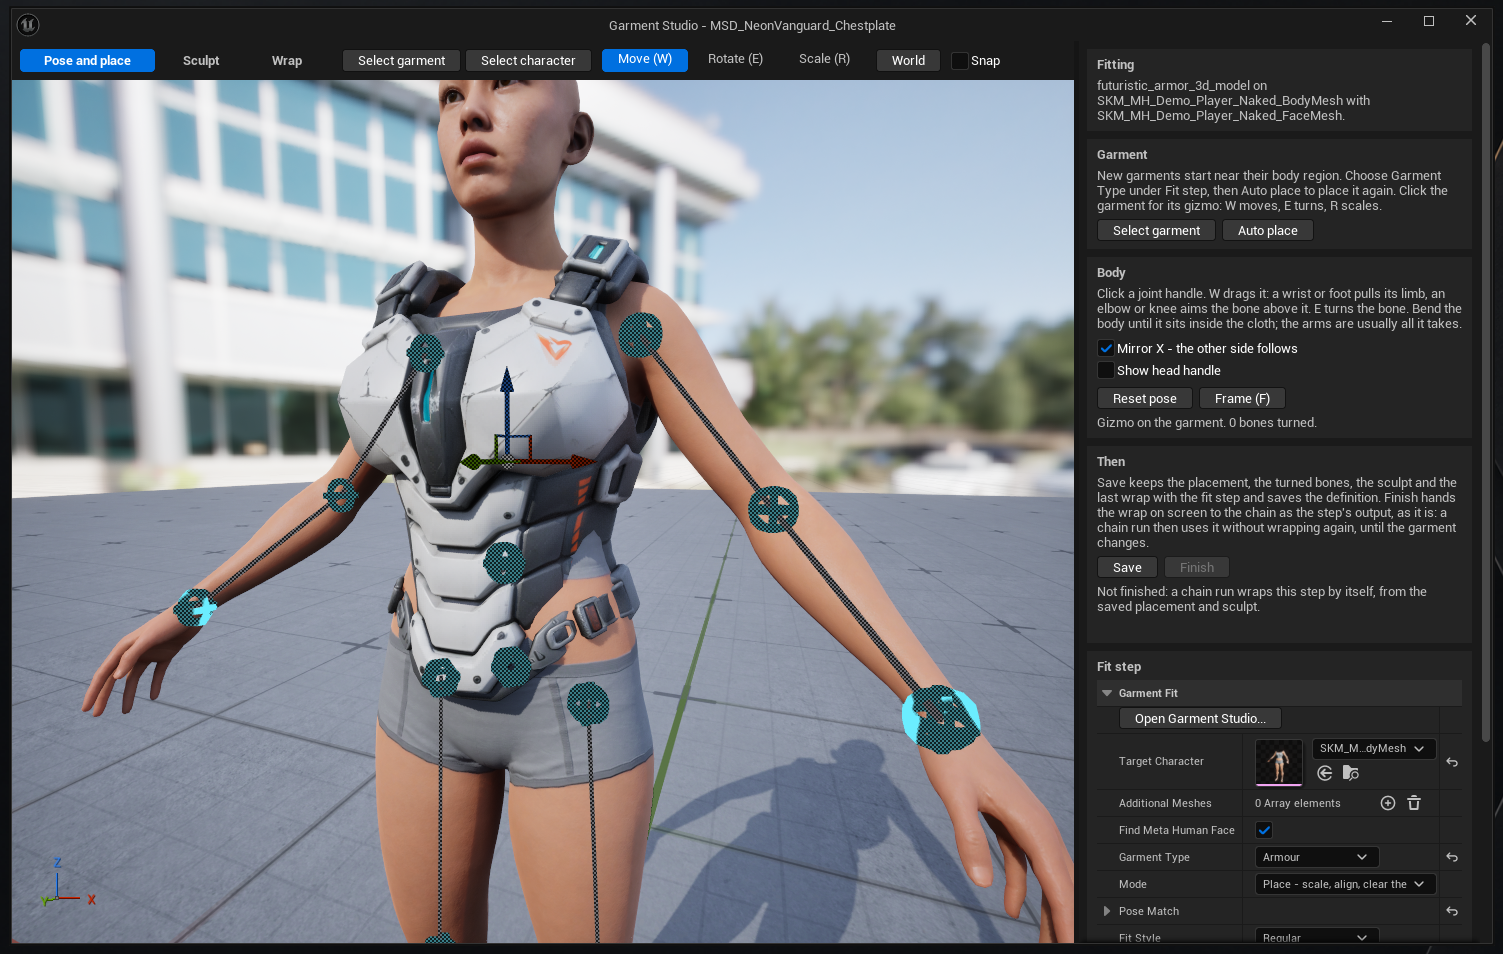
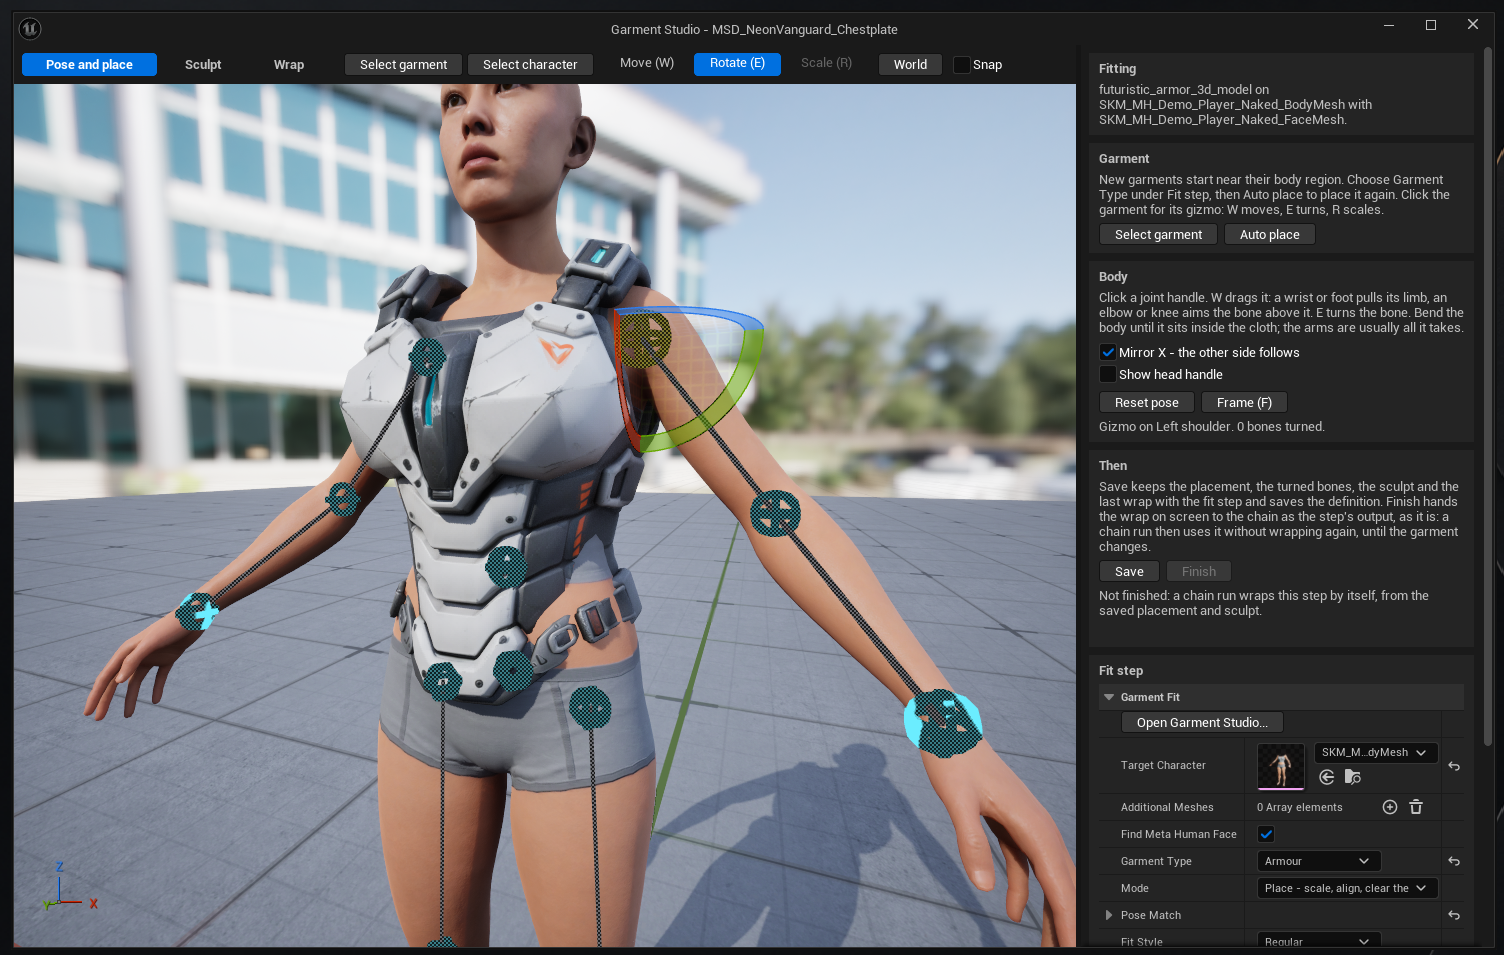
You are bending the body to suit the cloth, not the other way round. That sounds backwards until you read the panel's own advice — bend the body until it sits inside the cloth — and remember the pose is thrown away. It exists only so the solver starts from a position where the garment already roughly encloses the limbs.
Sculpt
Epic's Vertex Sculpt, Smooth, Lattice and Bend/twist, on the garment where it was placed and against the body as it was bent.
The panel says why that matters better than a paragraph could:
Sculpt the garment where it sits, against the body as you bent it: loosen a tight neck, pull a hem out of the legs. The wrap starts from this shape.
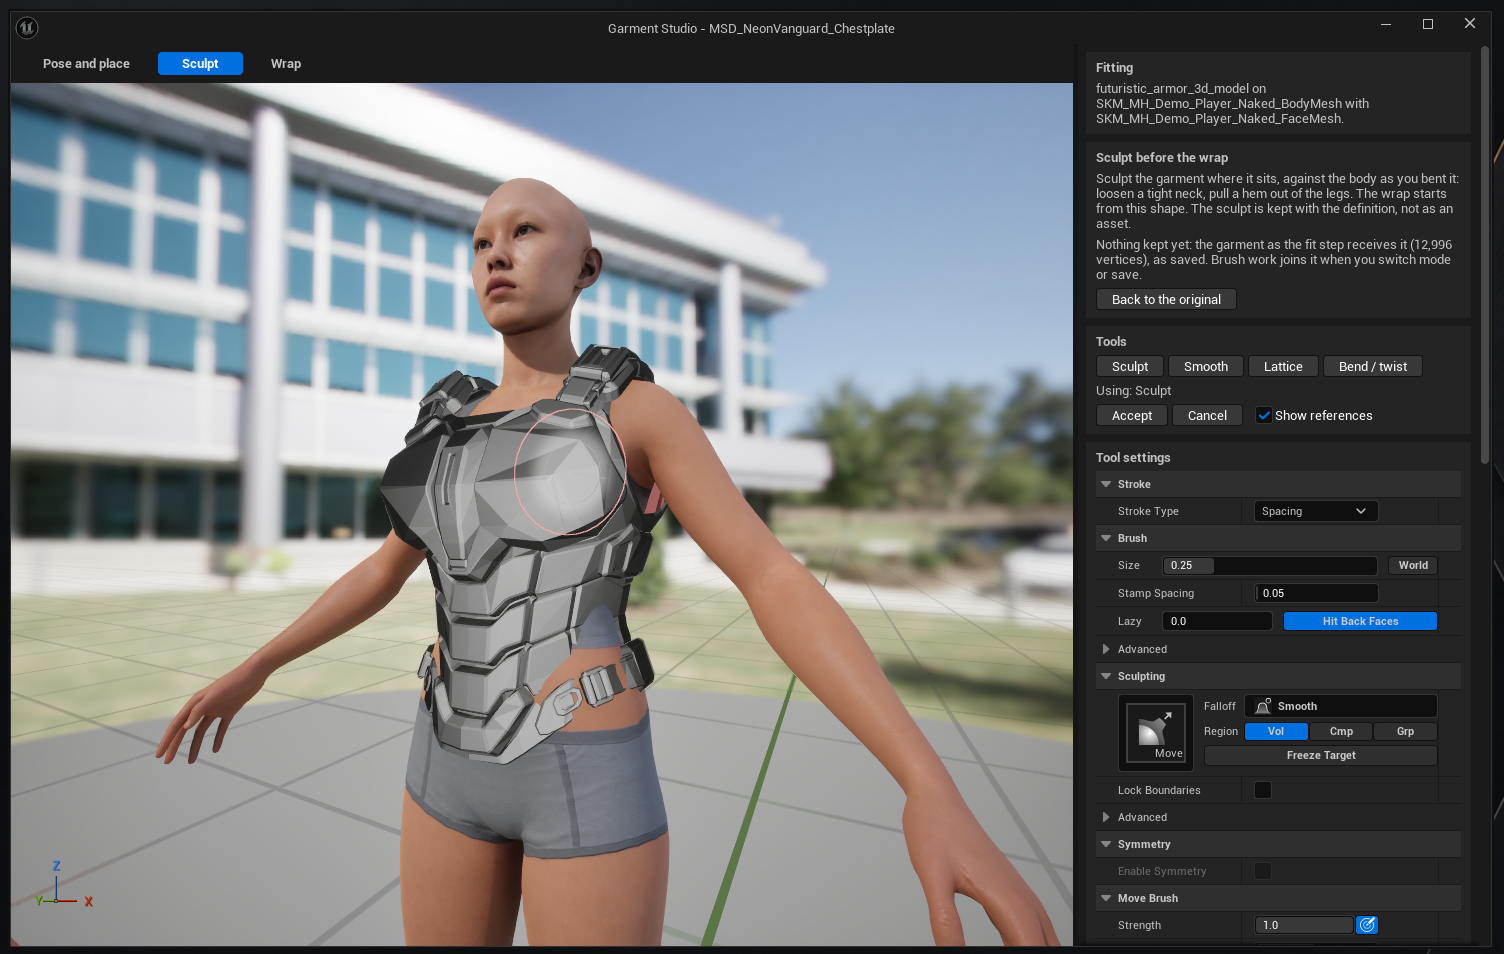
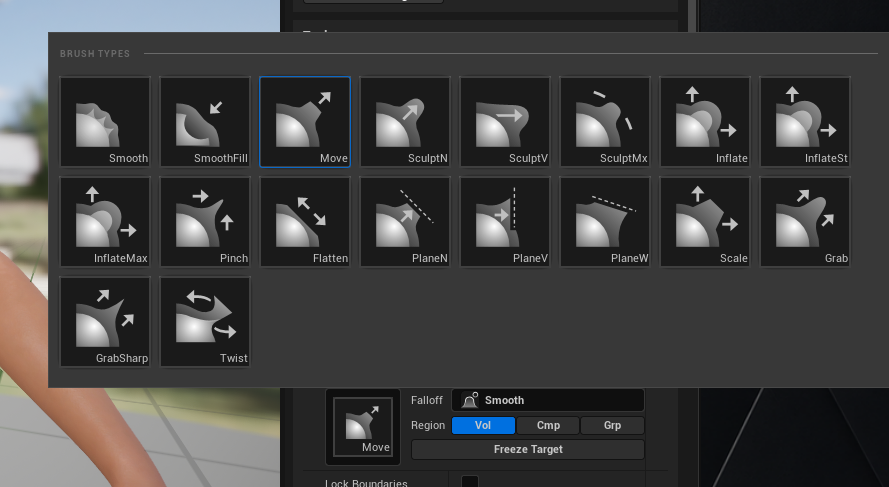
For shapes a brush is the wrong instrument for, two deformers:
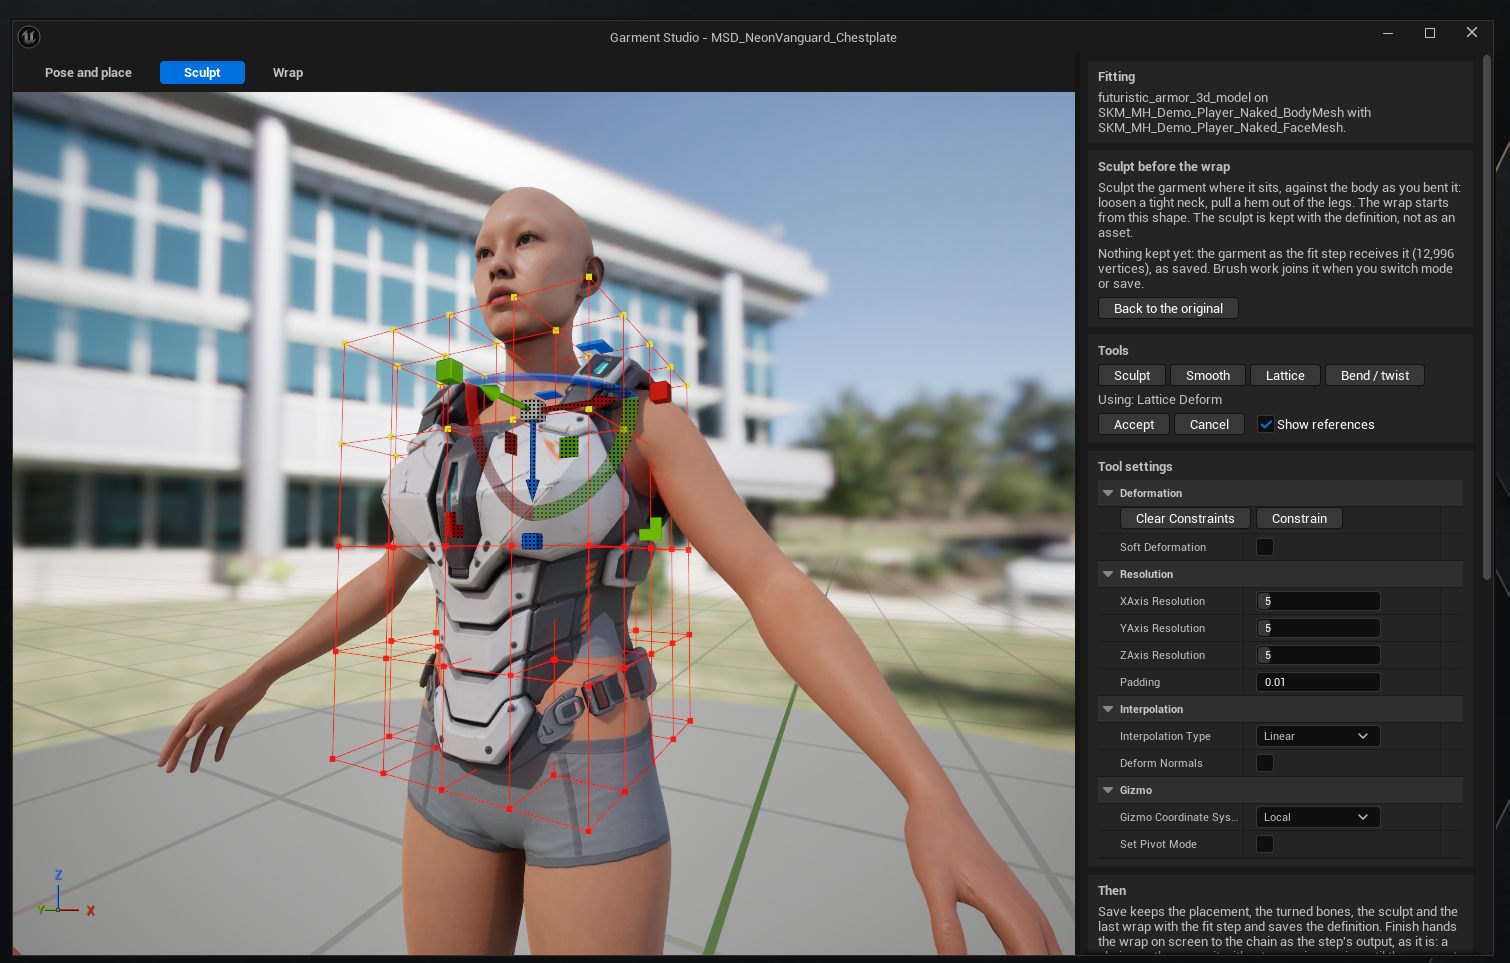
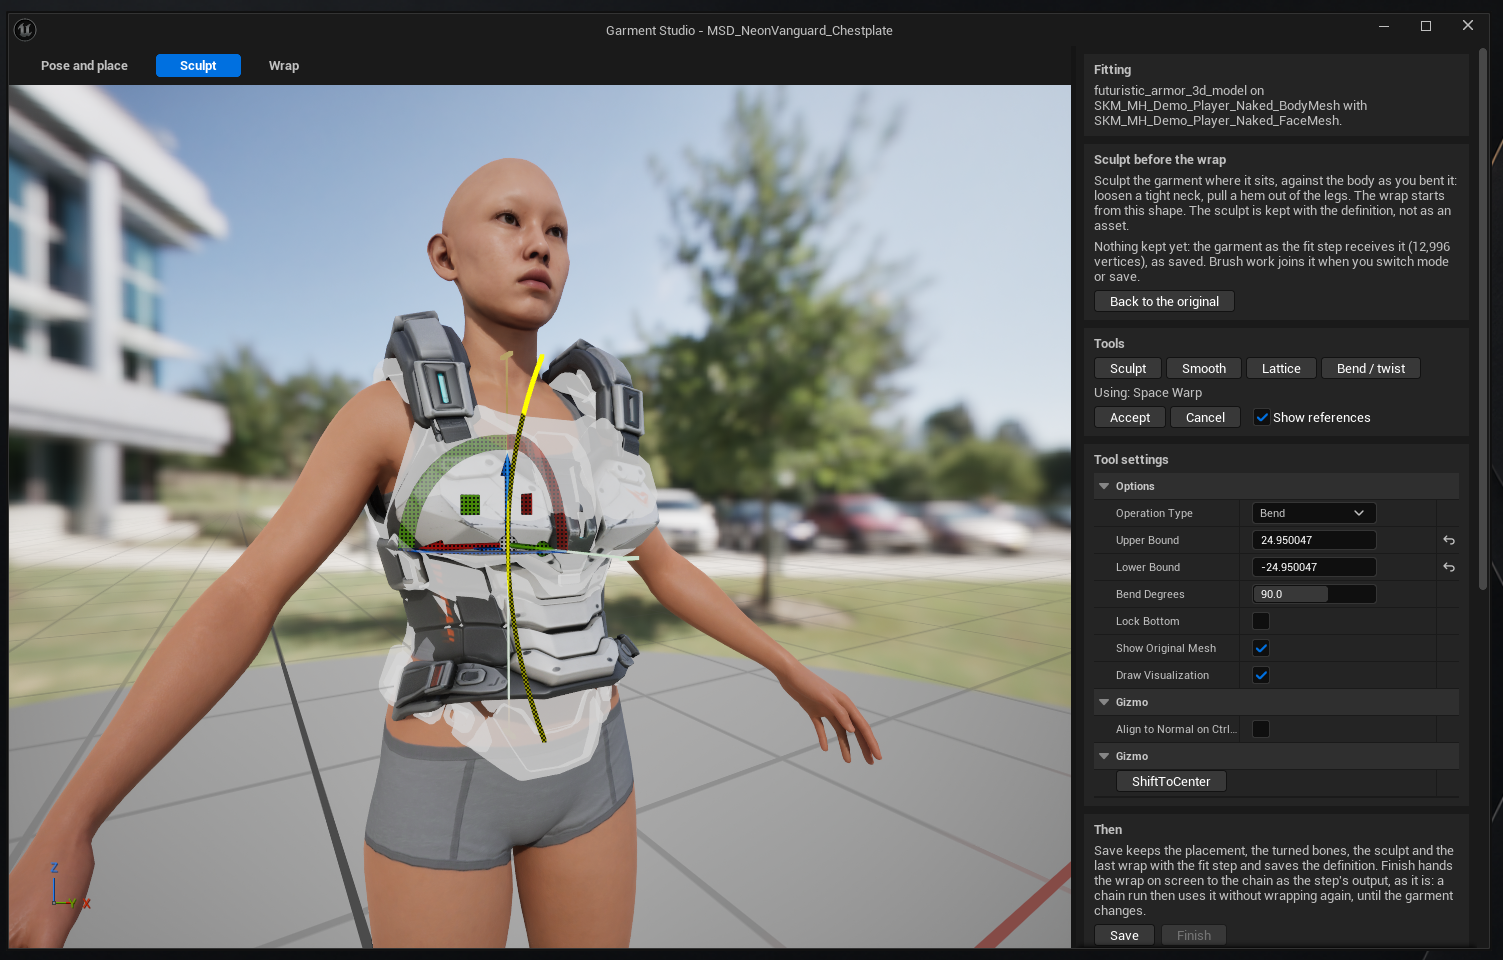
The sculpt is kept as a plain file in the definition's generated folder, not as an asset — stored as per-vertex positions plus a fingerprint of the input.
The panel is explicit about when brush work becomes part of that: "Nothing kept yet… Brush work joins it when you switch mode or save." Until then it is live geometry, and Back to the original throws it away.
A sculpt made on a garment that has since been regenerated is refused with the reason, rather than applied to different geometry. Back to the original discards it, and a changed sculpt makes the step stale.
Wrap
Runs the fit inside the window — about fifteen seconds — from My sculpt or The original, with the step's settings.
The solver reports where each vertex went and the studio moves its own vertices there, so the wrapped garment keeps the input's vertex order, UVs and material slots instead of being re-imported.
The studio flags a wrap that is out of date with the pose, placement, sculpt or settings. A wrapped garment can be sculpted too, and wrapping again over that sculpt asks first.
Save keeps the placement, pose, sculpt and last wrap on the step. Finish saves the wrap as an asset and records it as the step's output. Stop using the finished garment undoes Finish. Closing with unsaved changes asks first.
The studio puts the distinction in its own words, in the Then section:
Save keeps the placement, the turned bones, the sculpt and the last wrap with the fit step and saves the definition. Finish hands the wrap on screen to the chain as the step's output, as it is: a chain run then uses it without wrapping again, until the garment changes.
And beneath it, the current state in one line — "Not finished: a chain run wraps this step by itself, from the saved placement and sculpt." So you can always tell which of the two behaviours a later chain run will take, without guessing from whether the button looks pressed.
A finished garment goes on unchanged
If the step's input still matches the fingerprint it was finished on, a chain run passes the finished asset straight on without wrapping again.
If the input changed, or the finished asset is gone, the studio opens with the reason and the chain waits.
A step that was never finished wraps by itself, from the saved placement and sculpt — so an unattended chain still runs.
Wardrobe skinning
Makes a skeletal asset using Unreal's own weight transfer.
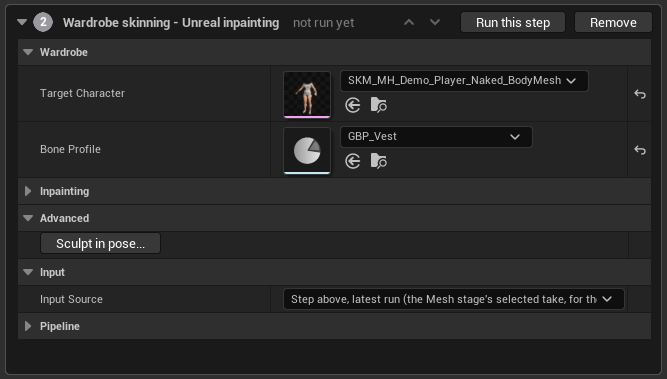
The Target Character appears on both steps, and it must be the same one. The fit step wraps the garment around that body; this step copies weights from it. Fitting to one body and skinning to another produces a garment that fits and then moves wrong — and nothing checks it for you.
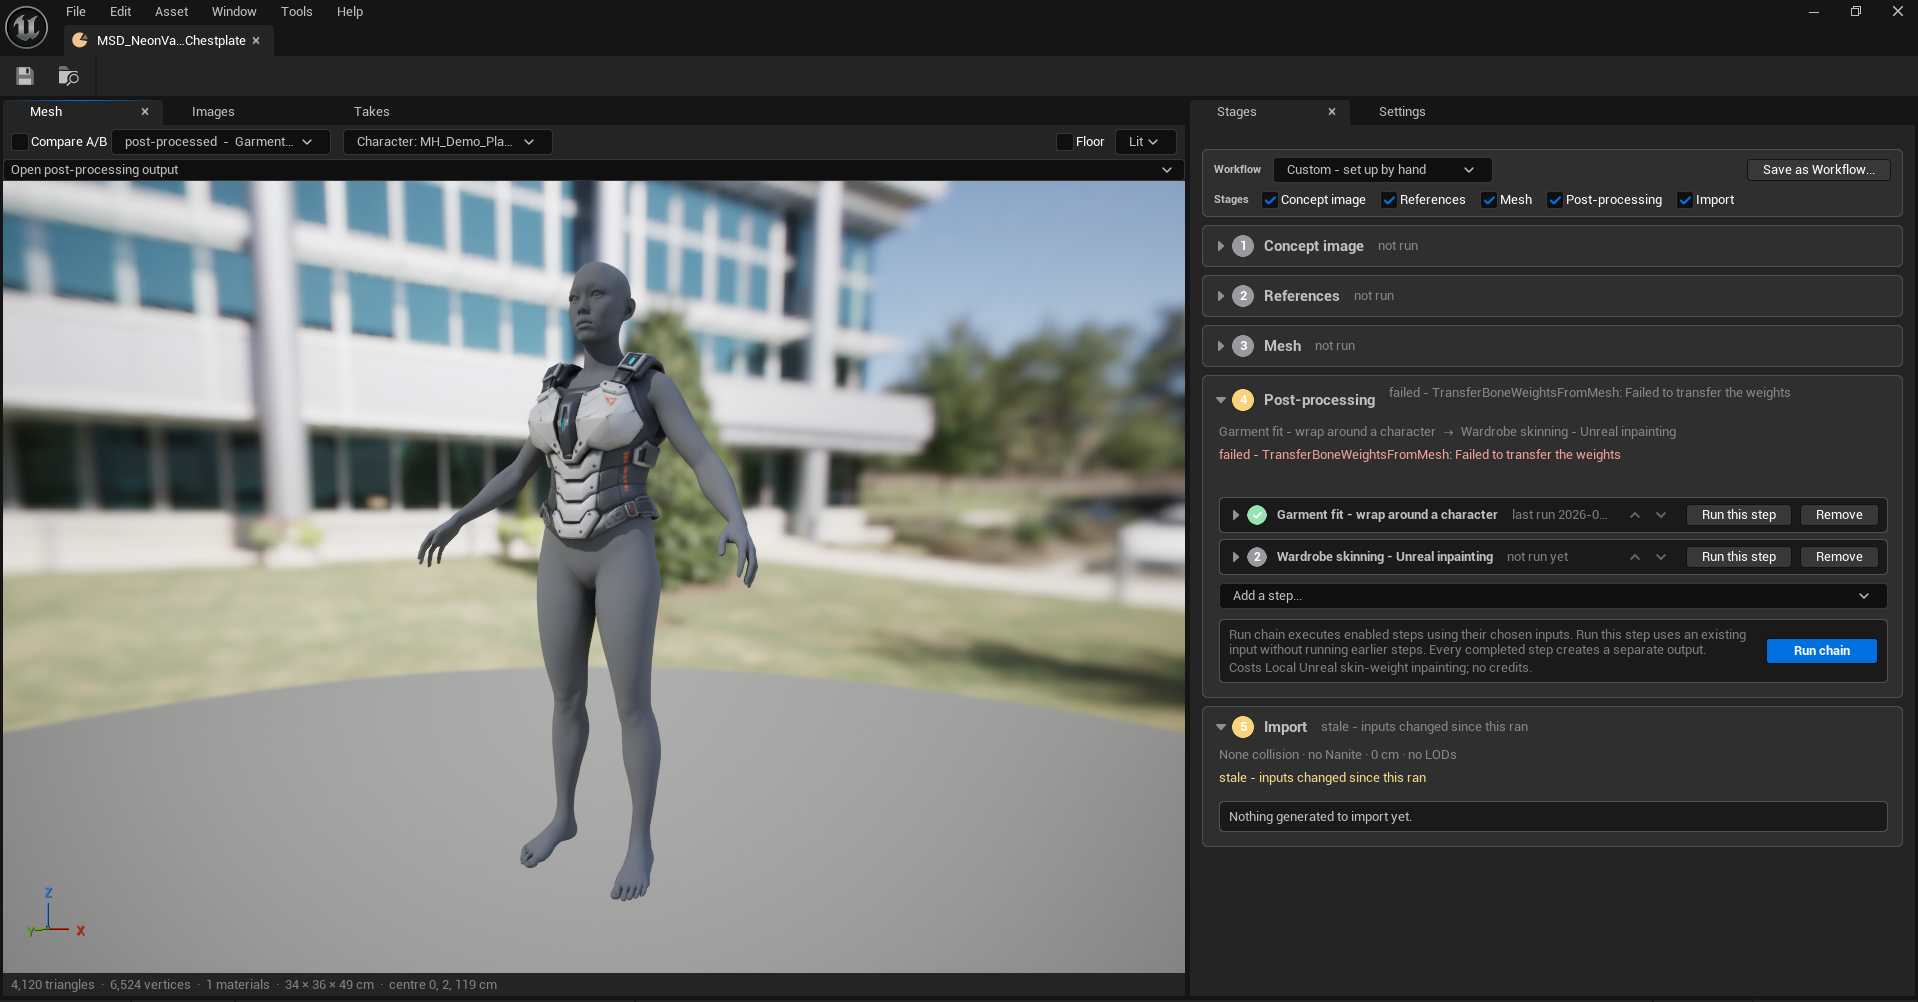
Each step runs on its own. Run chain executes the enabled steps in order; Run this step uses an existing input without re-running anything before it. That distinction is what makes a failed skinning step cheap to retry — the garment fit above it does not run again.
Note the cost line too: "Costs Local Unreal skin-weight inpainting; no credits." A step that spends nothing still says so.
It binds to the body mesh, not to the shared skeleton. That is the whole trick: the reference skeleton comes from the body mesh, so the garment matches the character it was fitted to rather than an idealised skeleton asset that differs from it.
Before saving, every bone is checked against the body's reference pose, and the step fails if any is more than 0.01 cm out.
Retries
The configured settings, then the normal test disabled, then that plus triple radius. A rung that would leave a garment piece with nothing to inpaint from is skipped rather than run.
Those rungs live under Inpainting, collapsed by default — the step is meant to be run with its defaults, and opened only when it has failed.
Sculpt in pose…, under Advanced, opens the newest skinned garment in Unreal's Skeletal Mesh Editor with the target character and its face beside it: for posed sculpting or pose correctives, after the weights exist.
Bone profiles
A data asset choosing which body bones a garment follows.
| Rule | Effect |
|---|---|
| Follow | Keep this bone and everything below it |
| Stop At | Drop this bone and everything below it |
The nearest listed ancestor decides, and Drop Corrective Bones folds shape helpers into their main bones.
GBP_ArmsOnly is the whole idea in four entries:
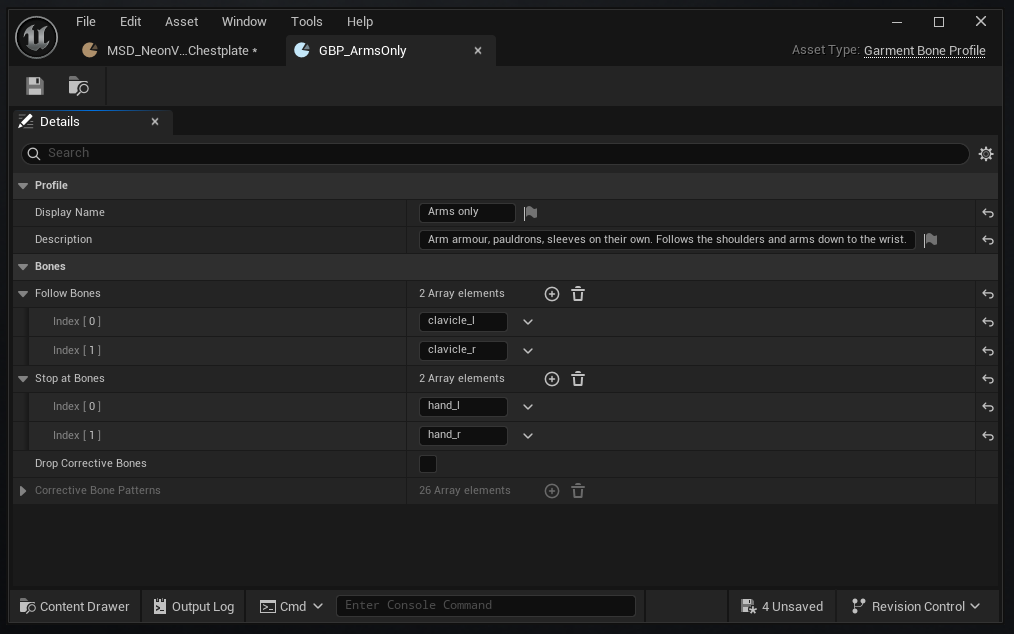
The 26 Corrective Bone Patterns are greyed out because Drop Corrective Bones is off. They are name patterns for the helper bones a rig uses to fix deformation at joints — real bones a garment will happily bind to, and almost never ones it should follow. Turn the option on and those bones' influence folds into the joint they correct.
The profile acts on the body before the transfer. An excluded bone's weight goes to the nearest kept ancestor. After the transfer, the step fails if any garment vertex still carries an excluded bone.
Thirteen ship: Head, Shirt/jacket, T-shirt, Vest, Arms only, Hands and feet, Pants, Pants and feet, Shorts, Full bodysuit, Full bodysuit and head, Backpack, Belt.
They are ordinary assets named GBP_*, picked in the step's Bone Profile
slot — GBP_Vest in the capture above.
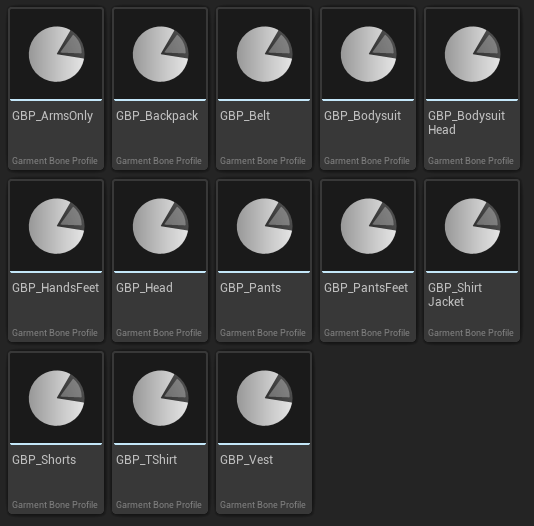
Make your own the same way as any other asset: Content Browser ▸ right-click ▸ Automation Forge ▸ MeshForge ▸ Garment Bone Profile.
Chest armour is a vest, not a shirt. The profile decides which bones the garment may follow, so a rigid chest plate given a shirt profile will follow the arms and deform at the shoulder — which looks like a skinning failure and is actually a profile choice.
Sculpt mesh — for any static mesh
A general hand-finished step, anywhere in a chain.
Epic's Vertex Sculpt, Smooth, Lattice and Bend/twist — all of which only move vertices. Tools that remesh are not offered, and a changed topology is refused on write-back.
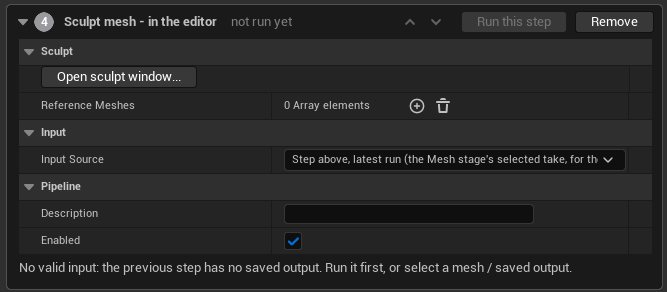
Reference meshes stand locked beside the subject (a MetaHuman body brings its face), and UV seams are welded while sculpting.
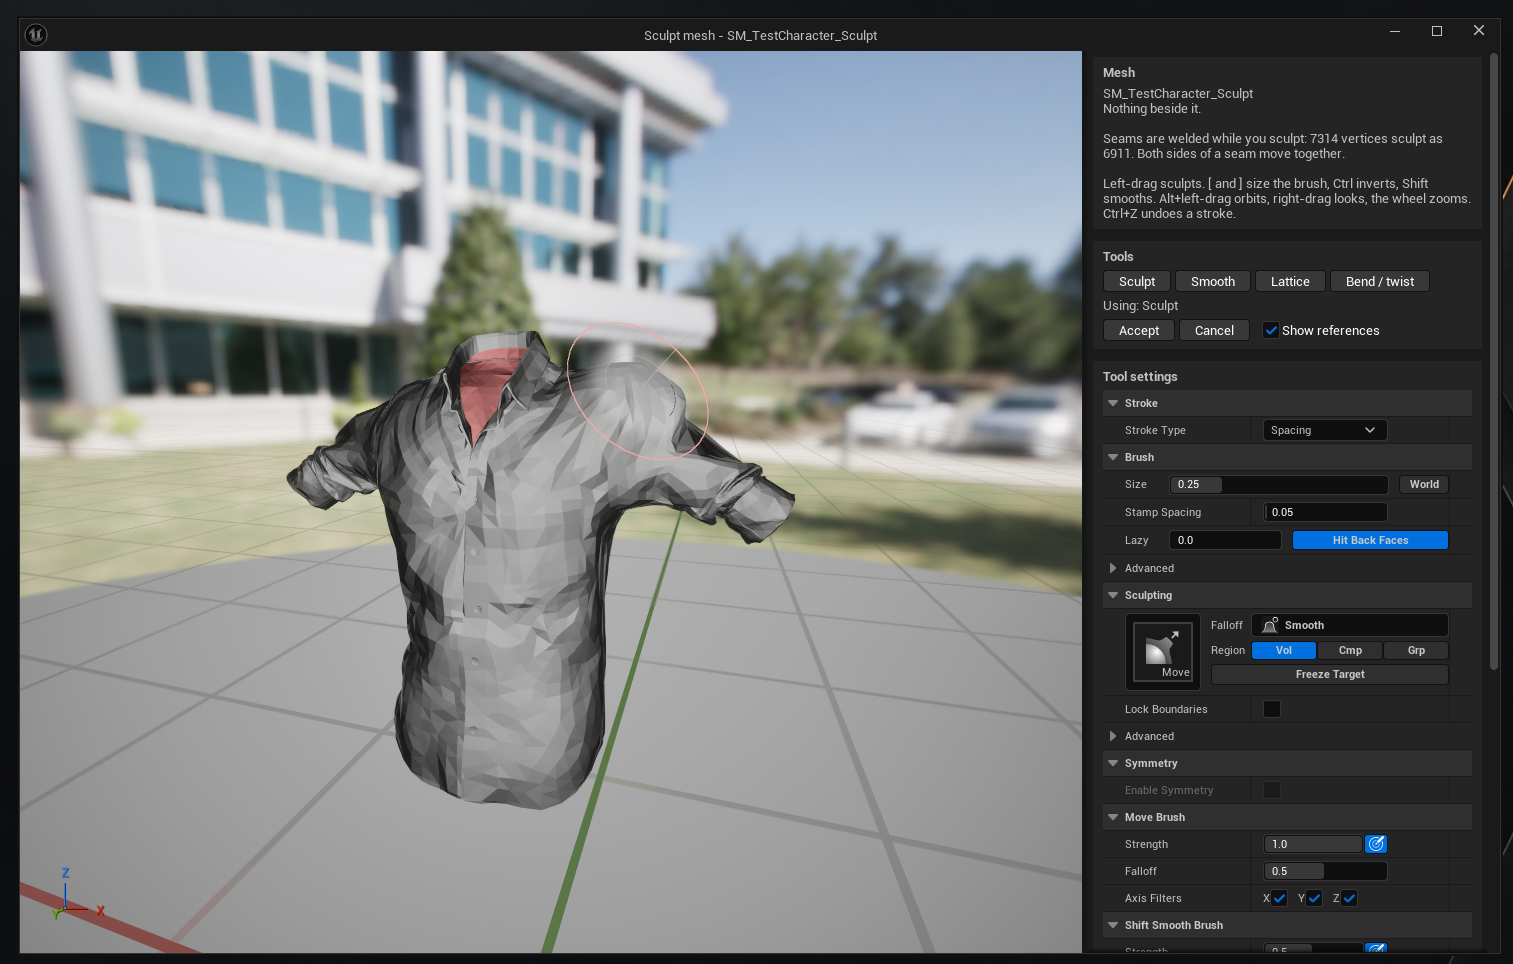
'Nothing beside it' is the Reference Meshes slot reporting empty. Fill it and the body stands locked beside the garment while you work, which is the difference between sculpting a shirt and sculpting a shirt that has to fit someone.
The same window serves this step and the Garment Studio's Sculpt mode — same four tools, same brushes, same controls. Only what it is handed differs.
Finish edit hands the working copy to the chain with nothing exported or re-imported.
Character in MeshForge's Mesh tab
Adds a Character control to MeshForge's viewer through the extension slot, so MeshForge itself knows nothing about characters.
Off by default. Offers No character, The one this definition fits, other characters named in the chain, a shared Recent list, and Any character. The answer is filed per definition in per-user settings, so a definition never asked about draws nobody.
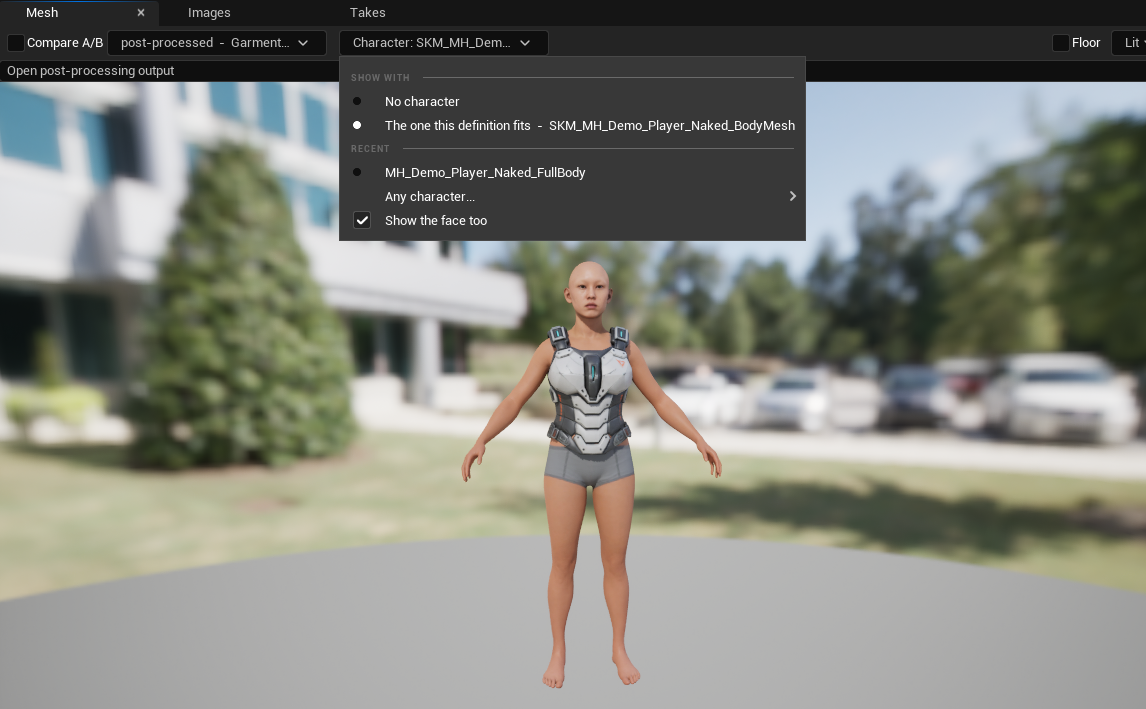
Show the face too is ticked by default, and for the same reason the fit step finds the face: a MetaHuman's body and face are separate meshes, and a collar judged against a headless body is judged wrong.
With a character shown, the viewer does not centre, turn or scale anything, and Align is disabled.
Not built
- A Studio wrap through the runner service — it fails with "the runner service does not return vertex positions yet". The local Blender route works.
- The skeletal output creates no Chaos Cloth asset, physics asset or animation Blueprint.
- No partial bone filter that keeps part of a bone.
- No check that a garment is skinned to the body it was fitted to.
Traps worth knowing
MetaHuman meshes report themselves as dirty on load. The editor's
is_dirty lies about them. Compare an md5 on disk before deciding whether
something changed, and back up before writing.
A saved copy of a transient mesh has no geometry and asserts on the next load. Duplicate the source asset and then write positions into it — never save a transient mesh directly.
A procedural skeletal mesh needs an LOD model, or it crashes on load.
Settings
Editor Preferences ▸ Automation Forge ▸ MeshForge Garment Fit, never committed: the route (Blender here else the runner / Blender on this machine / the runner service), the runner URL, the Blender executable, and a timeout.
Auto tries local Blender first.